Excel Introduction
Excel is a spreadsheet program that allows you to store, organize, and analyze information. While you may believe Excel is only used by certain people to process complicated data, anyone can learn how to take advantage of the program’s powerful features. Whether you’re keeping a budget, organizing a training log, or creating an invoice, Excel makes it easy to work with different types of data.
Objective: To be able to understand how to navigate the Excel interface and become familiar with some of its most important features, such as the Ribbon, Quick Access Toolbar, and Backstage view.
Terminology:
- Ribbon: The ribbon is a set of toolbars at the top of the window in Office programs designed to help you quickly find the commands that you need to complete a task.
- Quick Access Toolbar: Located in the upper left corner of the Excel window, above the ribbon.Customize the Quick Access Toolbar by using the Options command · Select File > Options > Quick Access Toolbar. · Use the Add and Remove buttons to move items
- Search Bar: “tell me what you want to do” to find tools and commands of things you want to do
- Normal View
- Page Layout: See where pages begin and end, and add headers and footers.
- Page Break Preview: Gives you a nice overview of where pages break when you print the document.Worksheet Views: At the bottom beside the zoom slide
Demonstrate
- Open Excel.
- Click Blank Workbook to open a new spreadsheet.
- Change the Ribbon Display Options (Click small down arrow) to Show Tabs if they are not already showing.
- Using the Customize Quick Access Toolbar, click to add New, Quick Print, and Spelling.
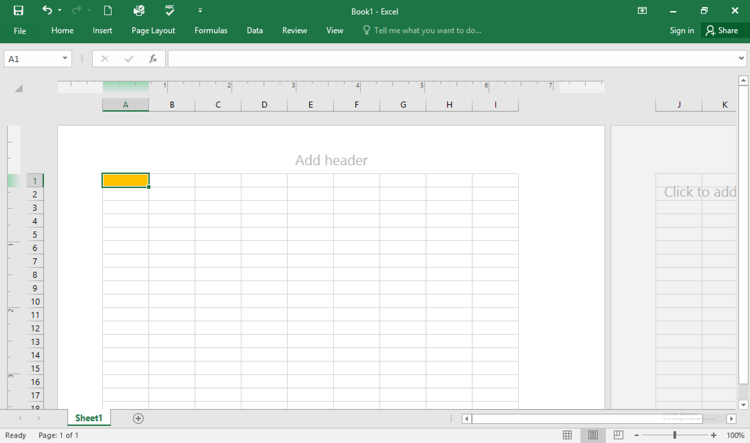
- In the Search Bar, type the word Color. Hover over Fill Color and choose a yellow. This will fill a cell with the color yellow.
- Change the worksheet view to the Page Layout option.
- When you’re finished, your screen should look like this:

- Change the Ribbon Display Options back to Show Tabs and Commands.
Excel Spreadsheet Basics
Excel 1: Working with Multiple Worksheets
Every workbook contains at least one worksheet by default. When working with a large amount of data, you can create multiple worksheets to help organize your workbook and make it easier to find content.
You can also group worksheets to quickly add information to multiple worksheets at the same time.
Terminology
- Cells: Organized in rows (numbers) and columns (letters)
- Formula Bar: A special toolbar at the top of the Excel worksheet window, labeled with function symbol (fx). You can use it to enter a new formula or copy an existing one.
- Tabs: Goes to different worksheet with separate rows and columns
- Worksheet: A worksheet (also known as a spreadsheet) consists of cells in which you can enter and calculate data. The cells are organized into columns and rows.
- Workbook: A workbook contains one or more worksheets.
- Grouping Worksheets: Worksheets can be combined together into a group. Any changes made to one worksheet in a group will be made to every worksheet in the group.
Challenge Assignment
- Open our practice workbook.
- Insert a new worksheet (you can also copy an existing worksheet to copy it’s formatting), rename it Q1 Summary.
- Move the Expenses Summary worksheet to the far right, then move the Q1 Summary worksheet so that it is between March and April.
- Create a copy of the Expenses Summary worksheet by right-clicking the tab, select Move or Copy, then at the bottem check the Create a Copy Box. Do not just copy and paste the content of the worksheet into a new worksheet.
- Move this new tab to before Expenses Summary.
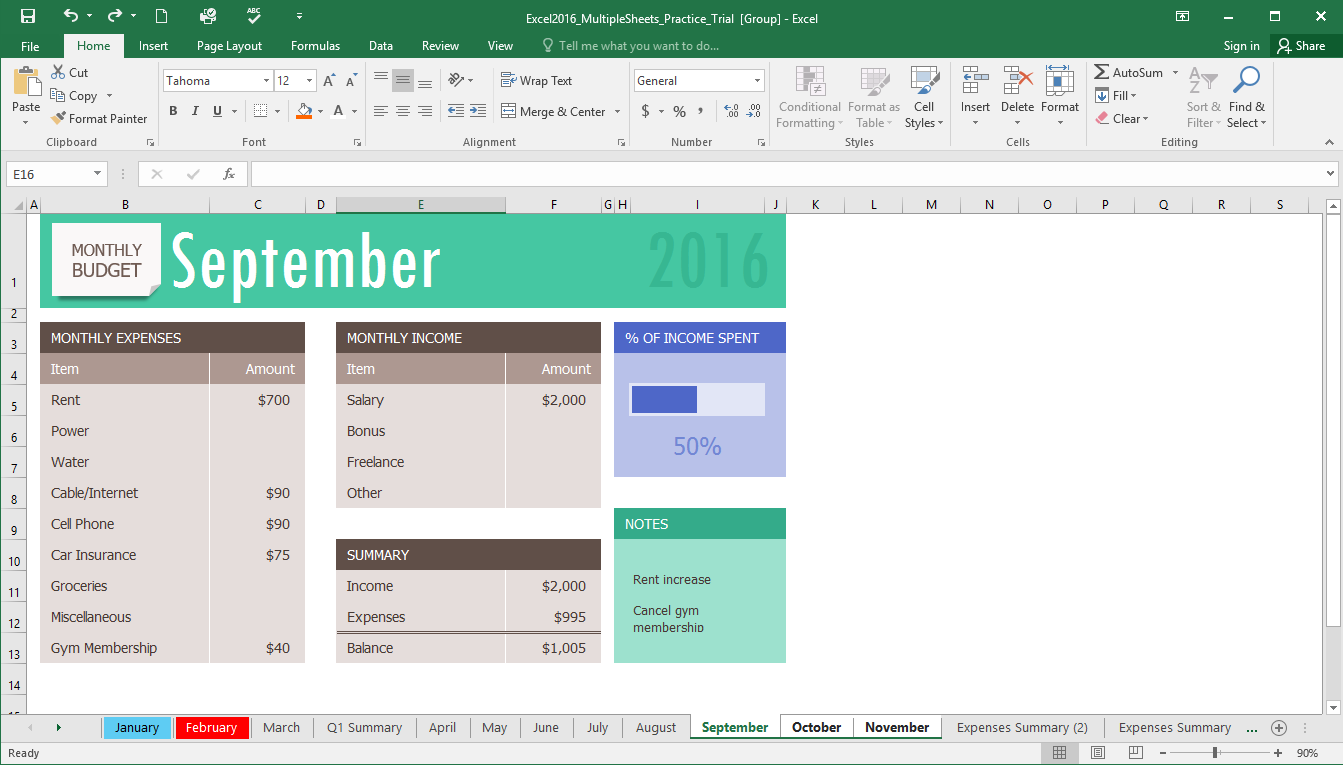
- Change the color of the January tab to blue and the color of the February tab to red. Right click on each tab and select Tab Color.
- Group the worksheets: Select the September, Press and hold the Ctrl key, Select October and November. Change the Rent to $775 on one of these sheets, while they are grouped it should change it on all three. (To Ungroup the worksheets: right-click a worksheet in the group, then select Ungroup Sheets. Alternatively, you can simply click any worksheet not included in the group to ungroup all worksheets.)
- When you’re finished, your workbook should look something like this:

- Upload File to Dashboard
Excel 2: Importing External Data
Challenge Assignment
- Create a New Blank Excel Workbook
- Download WSCC PC Apps Excel Intro.txt (remember where you saved it)
- Go to the Data Tab
- Select From Text/CSV, find the WSCC PC Apps.txt file.
- Under Delimiter, Choose Tab. A delimiter separates the regions. Other examples are colon (:), semicolon (;), slash (/), question mark (?), asterisk (*), backslash (\), quotation marks (“‘), and hashtag(#).
- Click Load
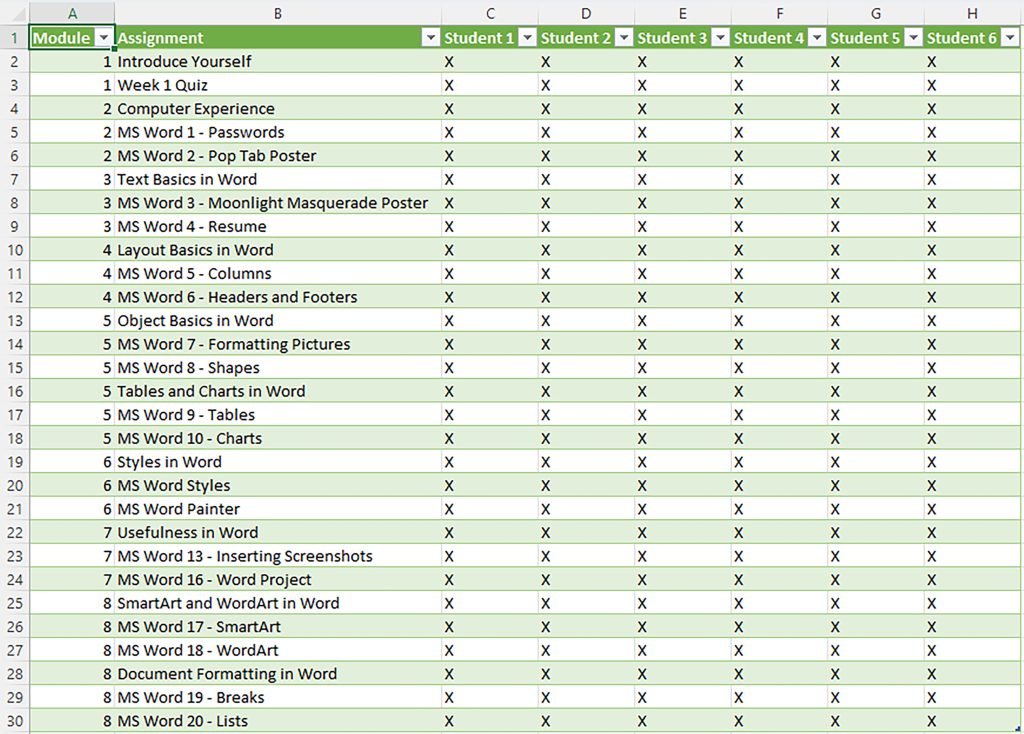
- You will see a sample of the data compiled from completed modules and should look something like this:

- Upload File to Dashboard.
